Nightmaw – Without Sayl the Faithless

I’ve had this Nightmaw (from Forge World’s Sayl the Faithless) primed and ready to paint for a long time. But recently I decided to do some experimenting and learn how to get better at painting skin and shadows. So Nightmaw was the perfect choice! Instead of his more purple depiction in the Tamurkhan book, he is now used as a Tzeentch Chaos Spawn.
Nightmaw is actually the result of 3 of Sayl’s fellow apprentices being melted together (disgusting, right?)

Nightmaw

I kept the base very clean to highlight the skin on Nightmaw. I had to freehand a lot of the skin, as it was too plain without. But the details on this are amazing! Here he is from a few more angles:

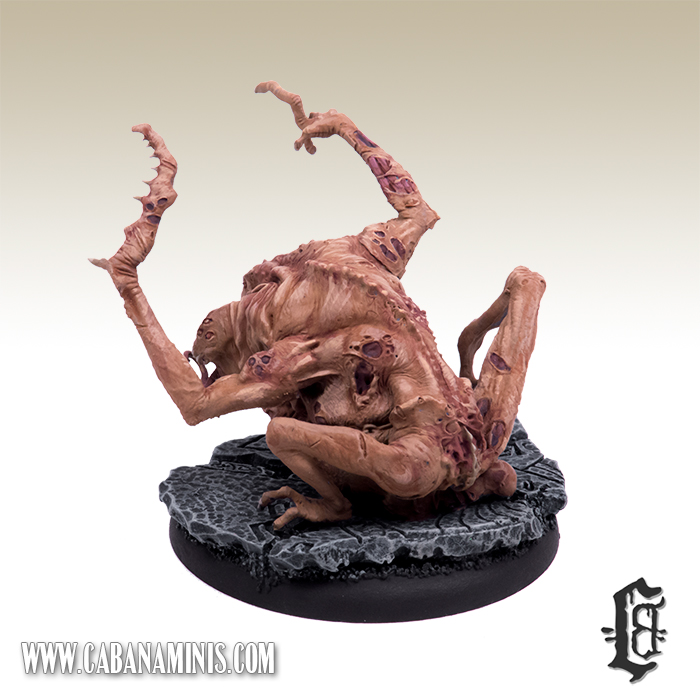
I only used Reaper Paints for this which are “hands down” the best skin paints in the world. The darkest shadow is Tanned Shadow (using the whole triad with Tanned Skin and Tanned Highlight) Then went on to Fair Skin (and the Fair Highlight). I painted bloodshot eyes based with Redstone Highlight (which is perfect for painting lips and soft wounds without looking pink) and Fair Skin Highlight as the brightest (it’s almost white)
The wounds were painted using Imperial Purple and highlighted with Redstone Highlight mixed with the skin colours on my palette.
I used a little bit of Flesh Wash from Vallejo to make the shadows a bit darker. The wash has a very matte finish and is great in small amounts.
Teeth and claws were painted the same way as the skin but highlighted with Khaki Highlights (I always avoid bright white colours, as it gives a very cold and often chalky feel to the miniature)

I spent around two evenings on this one (not including preparations, basing and priming), and he looks really badass in my display cabinet! Oh and his master Sayl is patiently waiting for a paint job on my table (as he has done for the past two years)…

Night Goblin Commander on Giant Squig

After a few days off in total relaxation (On the couch playing Divinity: Original Sin with my husband) I thought it was time to put up a post before returning to work!

Here is the latest addition to my Night Goblins, the champion of the Night Goblin Command group from Forgeworld.

I painted the Squig as having rusty armor with a few pretty additions made by the goblin in command! I also freehanded details on the goblin and highlighted his black robes with dark blue colours. A pretty handsome lad :-)

Oh and I decided not to paint his eyes completely red and just chose a red iris to give him more character.

I will need to find a substitute arm for the bannerman, since I used the banner for my goblin tree-city terrain, which I have been working on for quite a while now :-P

Happy New Year!

Christmas Diorama 2016 – Finished

Only 4 days left for Christmas (in Denmark we celebrate Christmas/Jul the 24th) Here is the final result of the Diorama!

Santa’s facial expression perfectly matches the situation and we are very proud of our Diorama!

We learned one thing this year though, and that’s the walls. We used a thick plaster on styro and it ended up looking a bit too messy. Next time we will file down the layer and make it much more smooth, especially when using colours on the walls. It looks great in our lighted vitrine however, and will stay there all year (every day is like Christmas in our home!)

This has been our second Christmas Diorama and we plan on making a new one each year! Next year it’s either the Frog Christmas or the Spooky Diorama (with a creepy santa!)

Classic Dryads to serve the Dryad Queen

As I wrote in the previous post, I made a trio of dryads (old metal versions before the plastic sets came out) My husband and I laughed at the idea, as the miniatures look a little ridiculous. However, I used all my skills to make them look authentic for our Nordland campaign and to match Drycha!

Dryad Trio

Again, I used various brown colours from Reaper and finished off with very light browns (I never use pure whites, as they easily comes out as chalky and way too bright) Reaper’s Khaki Highlights and Scale75’s Thar Brown are the brightest colours I use.

Dryad Trio

I painted the guy on the left first, and somehow thought I used 32mm bases instead of the 25mm he is on (he was hiding in our cupboard) so I put the other two on 32mm’s. (Kromlech’s Windfall bases as usual) Oh well, it looked fine on the game board :-P

Here is the trio next to Drycha (Even though lower dryads don’t really have a gender and usually transform into female beauties when luring soldiers into the woods, I thought that the 3 dryads had to be men luring village women in :-P )

Trio with Drycha

I would love to paint some of the plastic ones as more obvious female versions, but I will have to buy 16 at a time and the pretty neat Branchwych (foolish name aside) costs a staggering £14 for a single plastic mini… So I might wait a while!

Drycha the Queen of the Dryads – Or Nowadays: Branchwraith

As part of our Nordland campaign, we have quite a few Forest beasts and other monsters lurking in the background. One of those “things” is the Dryad Queen Drycha (which I took from my husband’s very old Wood Elf army and stripped of paint) Tried to paint her in a traditional way but with small freehand details and tiny dots to show that she is an “old lady” and has been in the forest for many years!

Drycha

Used Reaper brown paints, with Ghoul Skin highlights in her hair and bright blue eyes. The sprites are painted using Winter Blue with various highlights.

Drycha

The base is a 32mm Windfall round base from Kromlech (which I’ve used for many of my forest creatures so far!)

Painted a trio of dryads to go with her, that you can see in their own post :-D

Food Supplies Terrain from Ristul’s Market

I’m a huge fan of Ristul’s Extraordinary Market and their unique and quirky minis (as I have mentioned before!) and I recently decided to paint their Food Supplies Terrain. The set looks really great and in my opinion, outshines the Tabletop World Grocery set, which looks great on the table and when setting up a quick market place, but the scale is more of 32-35mm than 25-28mm that I use with my miniatures. There is also lot of customization in Ristul’s since you can combine it with the Food Supplies Basing Kit, and make your own unique Market Stands :-)

Ristuls Groceries

It takes quite a lot of time to paint, but the result is beautiful! And I’m really honored that Radek from Ristul’s chose to use it as main product picture! And coincidentally their top seller :-D

I’m halfway through their Road Signs that are going to fit right into my Mordheim table!

Christmas Diorama 2016 – WIP #5

Almost finished with the Christmas Diorama! Well it is actually finished, but we need to snap the last photos of it! It looks great!

But here is one of the last things I’ve painted for the Diorama, the Christmas Elf Mistress (Mrs. Claus’ friend) Added a few photos below! Stay tuned for a final post about the finished Diorama!

Naughty Commission Piece – Joan the Captive

As the headline says, I recently completed a commissioned miniature for an Italian customer! The miniature is from Russian company Brother Vinni, who creates a lot of female miniatures with questionable professions and more than a few minis with a more or less tragic post-war destiny (slaves, ahemm). Their miniatures are beautiful, detailed and well… naked :-P This one is Joan the Captive.

I painted this one as a convicted witch on her way to an unknown destiny (most likely accompanied by a witch hunter) Even though she has been through a rough time, she might still have a trick up her sleeve before she arrives at the stake!

Joan the Captive

I painted her dress as if it was made of vibrant silks and freehanded a few details. The skin is always tricky, but she ended up pretty good and she looks great in real “life” :-) I spent a lot of time on her eyes making them very bright and noticible. I added a few shades of green to her eyes for a more intense look!

Painted with Reaper MSP and Scale75 paints. Base is Stonefloor 25mm from Tabletop-art with a few Gamer’s Grass tufts. (cut up a few tufts to make them smaller to better suit the base)

Christmas Diorama 2016 – WIP #4

Once again my husband and me have made more progress on the Christmas Diorama – Click here to see the entire project

Below you can see a couple of pictures from the latest project update. As mentioned on the Projects page, we’re almost done with the full diorama now, we just need to add the final touches and of course post the progress pictures here!