More Pictures of the Merchant House

The last pictures, this time around, of the massive Merchant House from Tabletop-World.

The attic is filled with goods and delicious treats!

The attic was very fun to do, and all the warepiles really add to the atmosphere of the house! My favourite part of painting the warepiles, was painting the fruit and lettuce in particular! It took ages though, but hopefully we will have use of these for other things in our RPG sessions.
The warepiles are from Tabletop World, Tabletop-Art, Fenryll and Ristul’s creations – now sold and cast by Annie from Bad Squiddo!

The office of the rich merchant.

This is the office of the rich merchant! I used some of my favourite furniture I painted recently, including the cozy chair from the Mantic Terrain Crate – Wizard Study, the desk and large cupboard from Zealot Miniatures, chest from HQ-resin, and two small cupboards from Tabletop-World. The one with the shield is an old one and came exclusively from their old discontinued Blacksmith. The candelabra is from Thomarillion, and I really like this one, because it can stand reasonably well on its own!

I have so many exciting things to show, and hopefully I will have more time soon to show off more of my recent projects! Including my Dungeons and Dragons miniature (I am making a monster menagerie!!)

I have a ton of pictures on my Instagram profile! So check it out and follow my page for more goodies! :)
https://www.instagram.com/Cabanaminis/

More Pictures of the Merchant House

I thought it would be fun to create a children’s room in the Merchant House, so I found a bunch of bits I have had lying around since beginning of time (or the hobby, hehe) This is the 3rd floor of the house

I used a few helmets from the old Bretonnia Knights including a dragon’s head and a unicorn, which I HAD to paint as a rainbow unicorn!

The merchant’s daughter walking around in her own room at her father’s shop.

The companies used were Malifaux (old metal orphanage basing kit, which is AWESOME!) Retro Kids room accessories from HQresin, Fenryll, Tabletop-world, Games Workshop, Zealot Miniatures and Thomarillion.

Top view of the spoiled daughter’s room

I painted all the toys a little bit creepy aswell, since I need them for Blinsky’s Toy shop from our Curse of Strahd campaign (Dungeons and dragons) I also painted Blinsky with his pet monkey Piccolo :)

The room next to the daughter’s room is a storage room with another balcony to watch over the city!

Storage room leading up to the attic filled with wares and vegetables
Top view of the two rooms on the 3rd floor

Next up is pictures of the attic and the office on the 2nd floor!

Butcher with questionable ingredients!

I’ve painted the Fenryll Butcher and Stall before, but I thought it was time for a new version! My husband modified the stalls and added a little roof (and added all kinds of meat on a string)
Previously the butcher was a separate miniature, but this time I attached the miniature to the stalls, since I don’t use the miniature outside the stall anyways.

ButcherThe miniature was very fun to paint and ended up pretty macabre! I painted him in subtle colours, so the only real colour is the meat! (and blood) The idea of him having all kinds of meat which he finds in the gutters or roadkill is a very fun addition!

Here’s the model from different angles!

I thought it could be a good idea to show off the miniature before I painted it (but after it was primed), so here it is!

Butcher Unpainted


A Larder Shelf fit for a king! (or anyone who enjoys food!)

Just thought I’d squeeze in this little gem I finished painting a little while ago! I’m really proud of this one and it looks amazing on the table. I’ve been trying to clean out my miniatures, and replace the standard pieces with highly detailed and converted versions, and this is one of them!

shelf_aug_01

The shelf and broom are from Thomarillion, the flasks and barrel are from Fenryll, the pouch of plums (to the left of the shelf) and the package on top are from Tabletop-World. The baskets and letuce box on the bottom are from Ristuls Workshop, the middle boxes are from Fredericus Rex, and the pile of goods in the bottom and the sack on the left is from Baueda miniatures. So a lot of customizing and a whole lot of time included in this one. My husband picked out the parts and assembled this beauty and I painted it. It took much longer than anyone would expect, but it looks great in real life!

Banquet – A Feast for the Eyes!

Phew, been so long since I last posted. But at last we have now unpacked everything, and everything in the house is working! And my painting table is all set up with loads of HobbyZone modules (pictures come later!)

And we will be picking up our new (and cutest in the world) puppy this Sunday! I hope I have time to paint, cause I have a sneaking suspicion that I will be quite occupied by the little rascal.

Anyways! A few years ago I bought a set of Fenryll’s Banquet Table to paint for a customer (I actually bought 2, because an arm was missing and the table was broken in the 1st box) a little expensive, but I thought I would have this made in a short while… Boy, was I wrong! I ended up dropping the whole commission, because the time involved making the banquet scene would make the price ridiculously high, and gluing all the tiny pieces together would take somewhere around 8 hours…

So a few months ago, I picked up the set again, because we needed something like this for our tavern scenes. I am now very happy with the decision of dropping the commission, because this took me and my husband a huge amount of time. The result however, is absolutely amazing and brings so much life to our RPG!

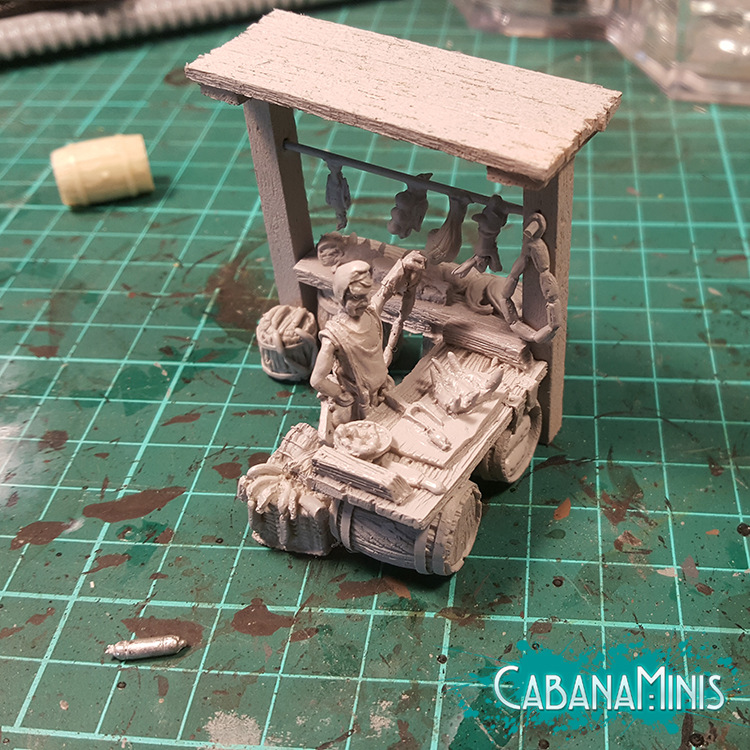
My husband assembled the banquet table, and since we decided to keep both sets, we agreed to go all out on accessories. While I assembled and customized the party guests (my husband helped too) The arms are ridiculously long, so I had to shorten those. And fixing them on the benches, my husband put together the table itself with the use of all our bitz boxes. We each spent atleast 8 hours that day, so that’s quite a lot!

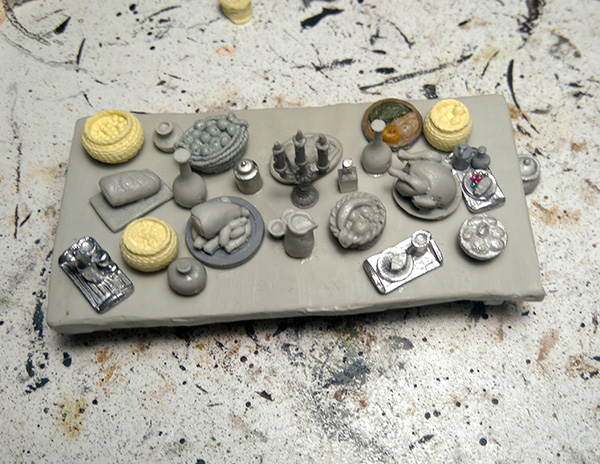
Here’s a few work in progress pictures of the table:

As you can see, there’s a heapload of stuff on it and from so many different companies (Fenryll, Ristul’s Market, Thomarillion, Maxmini, Fredericus Rex, Tabletop-art and a few Games Workshop items).
Only slightly bad thing is the crazy amount of time it took painting it. I didn’t count the hours, but I spent many evenings painting it. I went for a dark tablecloth to highlight the feast :-)

Banquet Table

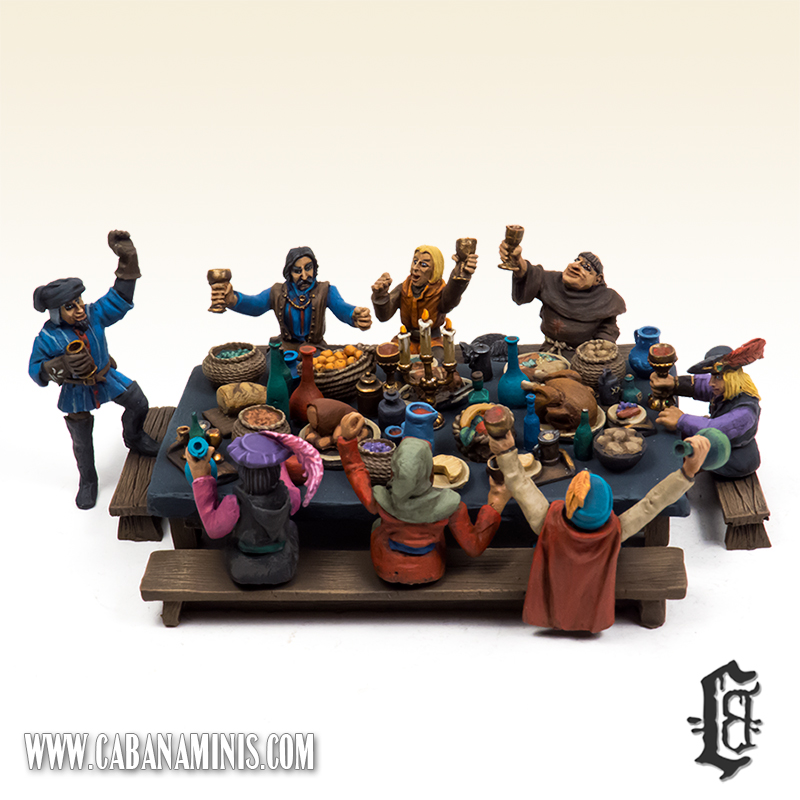
I painted the party-goers in many vibrant colours and the man resting his foot on the bench to the left, resembled Roche from the Witcher games, so I painted him accordingly!
All the benches can be used in a variety of ways. We didn’t glue them to the table, so we can use the table alone with RPG heroes and characters for a session, or we can use the benches for street scenes, church pews with happy people, or up against walls in taverns for a more rich scene!

The banquet scenery looks amazing in our dioramas. I will need to take some more pictures along with some of our other tavern scenes!

I still have 8 characters left from the other set and some benches from the kitchen set to make more of these guys, but all in good time :)

Medieval House Fronts – Fenryll Miniatures

We are almost packed and ready to move into our new house! We still have to wait 12 days, though. It’s going to feel like a looong time!

In the meantime, I thought I’d catch up with a post about 3 Fenryll Facades I painted some time ago. Since our gaming table isn’t very big (until we move!) Facades (or house fronts) are great for an easy set-up without filling the table with buildings. I made one of them a Jeweler’s Shop for our WFRP campaign! Used a lot of old bits and pieces to customize all the facades. Including some real jewellery for the sign and bits from the old Manor House Set from Games Workshop.

Fenryll House Front

The House Fronts were painted using Scale75 gold and metallic paints (from this Paint Set), Reaper paints and Citadel Paints (for the stonework) Also used a couple of posters for the shop sign and wall on the staircase version. I chose not to use the street diorama parts that came with the set as I deemed them too big, so I used some sidewalks from the Canadian company Kobblestone.

Next project is converting them to 1 large street piece, by converting the roofs or adding a background in between. Will look really great for showcasing miniatures!
Oh, and by the way! These looked really cool next to our Christmas Dioramas with a few “seasonalized” miniatures (dwarves with white beards and such) All three houses are available here: House Front # 1, House Front # 2, House Front # 3.

Christmas Diorama 2016 – Finished

Only 4 days left for Christmas (in Denmark we celebrate Christmas/Jul the 24th) Here is the final result of the Diorama!

Santa’s facial expression perfectly matches the situation and we are very proud of our Diorama!

We learned one thing this year though, and that’s the walls. We used a thick plaster on styro and it ended up looking a bit too messy. Next time we will file down the layer and make it much more smooth, especially when using colours on the walls. It looks great in our lighted vitrine however, and will stay there all year (every day is like Christmas in our home!)

This has been our second Christmas Diorama and we plan on making a new one each year! Next year it’s either the Frog Christmas or the Spooky Diorama (with a creepy santa!)

Christmas Diorama 2016 – WIP #4

Once again my husband and me have made more progress on the Christmas Diorama – Click here to see the entire project

Below you can see a couple of pictures from the latest project update. As mentioned on the Projects page, we’re almost done with the full diorama now, we just need to add the final touches and of course post the progress pictures here!


WIP: 2016 Christmas Diorama

Christmas is slowly approaching, which means that it’s time for yet another Christmas Diorama. Last year my husband put together a small outdoor Christmas Diorama, which I painted.
We decided to do another one again this year, but this time it’ll be a bit more complex. You can follow the progress of the Christmas Diorama in the Projects Section or by clicking here. 

The scene/story is set in Santa Claus’ home, where a young Mrs. Clause has brought her hot friend over, where together they’ll  surprise Santa Claus when he returns home after a long day of work delivering presents.

So the very first thing was to start building a floor and some walls. We cut out some styrofoam to use as walls and used some cardboard (Was actually a component from a board game) for the bottom. Below you can see the very first picture of the project, after 1 layer of plaster on the styrofoam walls.

Walls & Bottom #1

Miniatures & Furniture

We decided to use The Medieval Fireplace from Fenryll as the primary furniture in the diorama, setting up the scene around the large fireplace. As Mrs. Clause we’ll be using Mrs. Clause and Schnauzers from Dark Sword Miniatures and as Mrs. Clause’s naughty friend – Christmas Sophie 2009 from Reaper Miniatures without her wings!

The next picture shows the walls glued onto the bottom and two wooden sticks added to the top. Sophie is resting by the fireplace inside.

Walls & Floor #2

Click here to see more of the project!