Townsfolk Galore!

The past week I have made posts about townsfolk for our RPG, and I thought I’d squeeze in a few more, before I call it a day!
I’m going in for surgery this week and will be needing some time off afterwards :) nothing too serious, though. But probably for a week or two! Lots of time to play Divinity Original Sin 2 on our TV, and Gloomhaven Boardgame :-D

First off is the Middenheimer Young Blood. I already painted one of these with blonde hair and red dress and removed her weapons as an Npc crowd agitator. But I wanted to test my skills with subtle colours.

Middenheim Youngblood

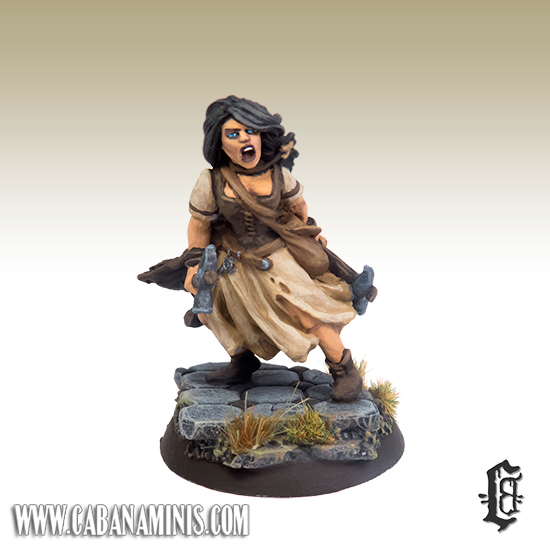
I used the same colour palette throughout the process. Darkest leather, shoes and fur is Muddy Soil, highlighted with Basic Dirt and Brown Sand. The dress is Brown Sand highlighted with Driftwood Brown, Stained Ivory and Yellowed Bone (and a bit of Khaki Highlight too) I used Tanned Skin mixed with Burgundy Wine for sharp contrast. All Reaper paints! I wanted her to look a bit dirty and not very polished and I believe I achieved that :)

Next off is “Lady Olenna “The Queen of Thorns” from Dark Sword Miniatures.

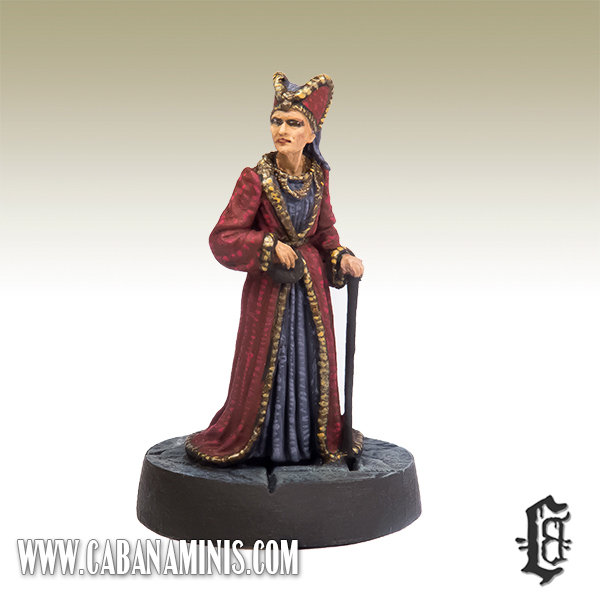
I took the opportunity to experiment with texture, and this is a rough example. I didn’t have much of a plan with this miniature, only that I wanted an old cranky noblewoman, and I got what I wanted, hehe :) The Base colour of her dress is Deep Red highlighted with dots of Fuchsia. The purple cloth is Violet with Sandalwood highlights. The golden embroidery is Walnut with dots of Victorian Brass and Citrine Alchemy. Dots everywhere! All paints used are from Scale75.
I didn’t spend a whole lot of time on the miniature apart from the dots, but she worked out okay. Not a masterpiece (like Jennifer Haley’s version which is absolutely breathtaking) but she looks great on the game board, as the dots intertwine from a distance!

Fishing Village and Lots of new projects to come!

As it says in the title, I am working on quite a lot of projects at the moment. Right now our main goal at home is getting the gaming room done. We are turning a guest bedroom in our house into a room designed for RPG and board games (big nerd alert!), and it’s really something! I will be making a project with WiP pictures and notes about the details.

Since getting a new house and a puppy at the same time proved to be a whole lot of work, I still managed to paint a great deal on the side! So when I get around to it, I will be adding a new project involving Forest Goblins with treehouses and lots of spider accessories + arachnarok spider and so on! Everything is converted and scratchbuilt, so it’s very unique and impressing! I just need to take a lot of pictures and come up with a name for the project.

We moved into our new house in March and we haven’t had time to play any RPG since, so we are looking very much forward to start playing again soon. And with the newly announced Warhammer Fantasy Roleplay (WFRP) 4th edition on the way, we are super excited to see what Cubicle 7 can dish up! We use or own rulebook and system, but fluff and ideas are always welcome!

The next campaign will start in a shabby fishing village (most likely in Talabecland), so we need some new props and terrain for such place. The village is influenced by Flotsam from Witcher 2 video game, which suits our grim and perilous playstyle.

House Boat docked at the village

Permantly docked is this ship from Thomarillion, which has been completely covered in various bits and pieces. My husband is the genius behind the conversion (I just painted it!), so credit really goes to him. He used several stacked crates and barrels from Tabletop-Art, pieces from Lake Town set from Games Workshop, Ristul’s Market, Freebooter boat accessories, some jewelry and much, much more from our bits boxes. The mast is scratch-built with some string/rope attached!

Here is a few Work in Progress of the ship

For the Boat and some of the wooden barrels I used this combo of Blackened Brown, Brown Leather, Orange Leather, Sandalwood, Driftwood Brown and Thar Brown from Reaper and Scale75. The Scale paints are very good for drybrushing. Sandalwood is a really creamy colour, which I like a lot. I also use it to highlight Ashen Brown from Reaper for a vague pink-brown colour.

The boat in all its splendor!

Fishing House Boat

Despite the fact that the boat could have had more weathering to it, I’m satisfied with the result! The shack is obviously a toilet, but we thought it as the idea of a person who converted a toilet and added stairs for descending into the hull :-P

I’ve also begun painting the Micro art studios Fish market and extra crates. The scenery pieces are huge, so I might add some minor barrels and such to the pieces to make them appear less gigantic, and so that they can fit into my other market stands. The large crate pile with the dangling fish, came riddled with holes (air bubbles), which requires some heavy modifications, but I think it will end up really cool :) I love the squids!

Fish Stuff

More projects to come and much more minis! Just need to squeeze some photographing into my busy schedule!

Nightmaw – Without Sayl the Faithless

I’ve had this Nightmaw (from Forge World’s Sayl the Faithless) primed and ready to paint for a long time. But recently I decided to do some experimenting and learn how to get better at painting skin and shadows. So Nightmaw was the perfect choice! Instead of his more purple depiction in the Tamurkhan book, he is now used as a Tzeentch Chaos Spawn.
Nightmaw is actually the result of 3 of Sayl’s fellow apprentices being melted together (disgusting, right?)

Nightmaw

I kept the base very clean to highlight the skin on Nightmaw. I had to freehand a lot of the skin, as it was too plain without. But the details on this are amazing! Here he is from a few more angles:

I only used Reaper Paints for this which are “hands down” the best skin paints in the world. The darkest shadow is Tanned Shadow (using the whole triad with Tanned Skin and Tanned Highlight) Then went on to Fair Skin (and the Fair Highlight). I painted bloodshot eyes based with Redstone Highlight (which is perfect for painting lips and soft wounds without looking pink) and Fair Skin Highlight as the brightest (it’s almost white)
The wounds were painted using Imperial Purple and highlighted with Redstone Highlight mixed with the skin colours on my palette.
I used a little bit of Flesh Wash from Vallejo to make the shadows a bit darker. The wash has a very matte finish and is great in small amounts.
Teeth and claws were painted the same way as the skin but highlighted with Khaki Highlights (I always avoid bright white colours, as it gives a very cold and often chalky feel to the miniature)

I spent around two evenings on this one (not including preparations, basing and priming), and he looks really badass in my display cabinet! Oh and his master Sayl is patiently waiting for a paint job on my table (as he has done for the past two years)…

Advertising Pillar!

As I mentioned in my Notice Board post, I also made an advertising pillar using a lot of posters either found online or self-made. The Advertising pillar is from Thomarillion and it has a really good size with loads of space for posters.

donald duck billposterI used Vallejo Satin Varnish on both sides of the paper posters like old time posters! Though a lot more succesful than Donald Duck’s attempt with soup can advertisements!
I simply added layer after layer of small posters, and I’m pretty sure there are shortcuts to this such as full printed sides, but this just gives it such an authentic look!
I actually made two of these as one of them was for my pre-painted section a while ago. It sold the same day :-)

It looks great on our Mordheim table as a terrain piece!

Here is the Pillar shown from one its sides :-)

Advertising Pillar

Most of the posters on this side of the pillar is made up of posters from the internet and our cool Ulli & Marquand Wanted posters. The wanted poster is Geralt of Rivia from the Witcher 2: Assassins of Kings!

I made a link in another post with some of the cool posters I used for my Notice Board Poster. Check it out :-)

Landship Project is Slowly Progressing!

One of my favourite projects (and most time consuming so far) the Marienburg Class Land Battle Ship is slowly coming on, and I recently bought a plinth for it. I actually plan to use it in my WFRP sessions (epic ones indeed!), so I won’t be permanently mounting it. The plinth is LARGE, and I first thought about making a scenery base on top of the plinth, but something tells me it will take a while. Already put more than 50 hours into the ship alone which is far from finished!

Here is the plinth in its “nude” form :-P

Ship Plinth

And here it is with what little of the ship I have completed! The missing parts are almost fully painted but I am missing the shield crests as I haven’t finished the colours yet. Oh, and obviously the mast and 7 crew members whose uniform colours I am breaking my brain over! The ship looks a little small for the plinth, but the sides and front (including figurehead) is yet to be attached :)

Ship WiP

The wheels were excruciating to paint and I really wish I had an airbrush for it! I really wanted the ship a bit toned down, so no shiny metal parts on the wheels. I used black and blue/grey highlights instead. Let’s see how that works out :-)

Stay tuned for more updates! I hope to finish the ship in 2016, but you never know! Atleast I have finished the Tabletop World Gate :-D

Posters for Notice Boards!

I’ve received several mails and comments about the posters I used for the Message/ Notice Board, and I have made a PDF file with all the posters in various shapes and colour shades. Sometimes it just fits better with a pale neutral poster when I put them on buildings and such :)

Download Here – It’s a really BIG file in high resolution. (15 mb) so have patience!

Here is one we used as hand-outs for our RPG sessions. My husband is the GM and made the poster from an old softcover book.
We originally intended to use it for the old collector miniature Ulli & Marquand’s Wanted Poster Sign, but we ended up with another idea. Reminds me that I need to get that up on the blog some time :-P

Here is the Message Board in its full glory as shown on the Original Post

Notice Board

I used a small decal scissors for the cut-outs and something called Alles-kleber (which I assume is normal hobby glue) and very carefully glued the posters on the wooden frame :-)